- ssh เข้าไปที่ esxi host ก่อนเลยครับ จะด้วย putty หรือถ้าใครใช้ linux ก็เปิด terminal ขึ้นมาแล้วใช้คำสั่ง
# ssh root@esxi-server
- ใช้คำสั่งดูก่อนครับว่ามีคอนฟิกเก่าอะไรอยู่บ้าง
# esxcli network ip interface ipv4 get


Name  IPv4 Address   IPv4 Netmask   IPv4 Broadcast  Address Type  DHCP DNS
----  -------------  -------------  --------------  ------------  --------
vmk0  10.224.199.12  255.255.255.0  10.224.199.255  STATIC           false
vmk2 192.168.10.13 255.255.255.0 192.168.10.255 STATIC false - แก้คอนฟิกด้วยคำสั่ง
# esxcli network ip interface ipv4 set -i vmk2 -I 192.168.10.111 -N 255.255.255.0 -t static
- ดูอีกทีครับ
# esxcli network ip interface ipv4 get


Name  IPv4 Address   IPv4 Netmask   IPv4 Broadcast  Address Type  DHCP DNS
----  -------------  -------------  --------------  ------------  --------
vmk0  10.224.199.12  255.255.255.0  10.224.199.255  STATIC           false
vmk2  192.168.10.111  255.255.255.0  192.168.10.255  STATIC           false
Tuesday, September 9, 2014
การเปลี่ยน ESXi host IP Address ด้วย ssh command line
วันนี้เราจะมาดูวิธีเปลี่ยน ip address ของ esxi host ด้วย command line กันนะครับ ซึ่งวิธีนี้ถ้าคนที่ใช้คล่องก็จะรู้สึกว่าสะดวกมากเลยทีเดียวนะครับ เพราะไม่ต้องมานั่งล็อกอินเข้า vsphere client หรือ ต่อหน้าจอ console หรือ iLo หรือจะอะไรก็แล้วแต่ครับ และที่สำคัญ linux ก็ใช้ได้เลยโดยไม่ต้องติดตั้งอะไรเพิ่มด้วยครับ เอาล่ะครับมาเริ่มกันเลยดีกว่า
Monday, September 8, 2014
การ config ให้ใช้ ssh ได้โดยไม่ถาม password
การ Config ssh ให้ไม่ต้องถาม password
วิธีนี้เป็นวิธีที่ไม่ค่อยจะแนะนำนะครับ จุดประสงค์จริงๆก็คือเอาไว้ใช้สำหรับระบบ automate นะครับ
เช่น autodeploy autoemate-testing etc.
ส่วนวิธีการก็ไม่มีอะไรยากครับ ก่อนเริ่มมาอธิบายกันก่อนครับว่าเราจะทำอะไร
- ใช้ user : test ของเครื่อง1 secure shell เข้าไปที่ user : test2 ของเครื่อง 2 โดยไม่ต้องใช้ password ครับ
มาเริ่มกันเลยครับ
เป็นไงบ้างครับ ไม่ยากเลยนะครับ สำหรับครั้งนี้ก็ขอลาไปเพียงเท่านี้ครัช สวัสดีครัช 555
วิธีนี้เป็นวิธีที่ไม่ค่อยจะแนะนำนะครับ จุดประสงค์จริงๆก็คือเอาไว้ใช้สำหรับระบบ automate นะครับ
เช่น autodeploy autoemate-testing etc.
ส่วนวิธีการก็ไม่มีอะไรยากครับ ก่อนเริ่มมาอธิบายกันก่อนครับว่าเราจะทำอะไร
- ใช้ user : test ของเครื่อง1 secure shell เข้าไปที่ user : test2 ของเครื่อง 2 โดยไม่ต้องใช้ password ครับ
มาเริ่มกันเลยครับ
- เข้าเป็น user : test ของเครื่อง 1 ครับ
# su - test
- สร้าง path ที่ไว้เก็บ key ครับ
[test@server1]$ mkdir /home/test/.ssh
- genarate key ครับ
[test@server1]$ ssh-keygen -t rsa -b 2048
- จากนั้นก็โยนไฟล์ไปให้ เครื่อง 2 ครับ
[test@server1]$ ssh-copy-id test2@server2
- ทีนี้ก็ลองใช้ได้เลยครับ ถ้าได้ก็จะขึ้น prompt มานะครับ ถ้าไม่ได้จะเป็นชื่อ user เดิม
[test@server1]$ ssh test2@server2
-bash-4.1$
เป็นไงบ้างครับ ไม่ยากเลยนะครับ สำหรับครั้งนี้ก็ขอลาไปเพียงเท่านี้ครัช สวัสดีครัช 555
Labels:
automate,
IT Infrastructure,
Linux,
rsa,
secure shell,
ssh
Saturday, August 23, 2014
การติดตั้ง และคอนฟิก virtual DNS Primary(master) Server บน VMware (CentOS6.4)
การติดตั้ง และคอนฟิก DNS Server บน VMware
dns server คืออะไร
dns ก็คือ domain name system
server ก็คือ เครื่องแม่ข่าย
virtual ก็คือ การจำลอง
เมื่อเอามารวมกันก็ได้ว่า เครื่องแม่ข่าย dns เสมือนนั่นเองงง **ยิ่งแปลยิ่งงง อิอิ
DNS มีหน้าที จับคู่ IP address กับ hostname แล้วแปลงไปกลับนะครับ จะว่ายังไงดีล่ะ ก็ประมาณเป็นเหมือนหน่วยงานหนึ่งที่ทำหน้าที่ เก็บข้อมูลของคนไทย แล้วบันทึกว่าคนไหนใช้เบอร์โทรศัพท์อะไรประมาณนั้นอ่ะครับ เวลาเราเรียกเครื่องจากปกติ เราจะต้องเรียกเป็น ip addr เช่น
- ping [ipaddr]
- http://[ipaddr]
เป็นต้นนะครับ เจ้าตัวนี้จะช่วยให้เราเรียกเป็นชื่อได้ เราจึงไม่ต้องจำเป็น ipaddr ครับ เช่น
- http://www.google.co.th
- http://virtualitinfra.blogspot.com
แล้ว primary คืออะไร ก็คือการทำ redundancy กันครับ เผื่อว่าตัวนึงร่วงจะได้ไม่กระทบกับระบบครับ
ทีนี้เรามาดูกันดีกว่าว่าจะใช้เจ้านี่ได้ยังไง
อ่อ! ลืมบอกไป วิธีนี้ใช้ได้กับทั้ง virtual server และ physical server เลยนะครับ
- ก่อนอื่นก็ mount แผ่น CentOS 6.4 ก่อนเลยครับ
- mount cd ครับ
# mkfir /mnt/cdrom
# mount /dev/sr0 /mnt/cdrom
- ไปแก้ไขไฟล์ repo ครับ
# vi /etc/yum.repos.d/CentOS-Media.repo
ตรงบรรทัดbaseurl=file:///media/CentOS/
ให้แก้เป็นbaseurl=file:///mnt/cdrom/
จากนั้นกด ESC และ :wq เพื่อเซฟไฟล์ครับ - update repos
# yum update -y
- install bind ครับ
# yum install bind bind-utils -y
- จากนั้นก็ไปคอนฟิกไฟล์ /etc/named.conf ครับ
# vi /etc/named.conf
ดูในส่วนของ option ก่อนนะครับ
options {
listen-on port 53 { 127.0.0.1; 10.224.202.11;}; #ip master server
listen-on-v6 port 53 { ::1; };
directory       "/var/named";
dump-file       "/var/named/data/cache_dump.db";
statistics-file "/var/named/data/named_stats.txt";
memstatistics-file "/var/named/data/named_mem_stats.txt";
allow-query     { localhost; 10.224.202.0/24;}; #IP Range client
allow-transfer  { localhost; 10.224.202.12;};   #DNS Slave server
        recursion yes;
        dnssec-enable yes;
        dnssec-validation yes;
        dnssec-lookaside auto;

        /* Path to ISC DLV key */
        bindkeys-file "/etc/named.iscdlv.key";

        managed-keys-directory "/var/named/dynamic";
};
จากนั้นประกาศ zone ใหม่ขึ้นมาท้ายไฟล์ครับ ต่อจาก zone "." IN ... นะครับ ในที่นี้จะใช้ว่า demo.local นะครับ ส่วนของ forward zone ก่อนเลยครับ forward zone ก็คือ การ mapping hostname -> IPADDR ครับzone "demo,local" IN { type master; file "f.demo.local"; allow-transfer { 10.224.202.12; }; #IP slave server };จากนั้นก็ reverse zone ครับ ก็คือ ส่วนที่ทำหน้าที่ แปลง IPADDR -> hostname ครับzone "202.224.10.in-addr.arpa" IN { type master; file "r.demo.local"; allow-transfer { 10.224.202.12; }; };
จากนั้นก็ เซฟไฟล์และปิดไฟล์ครับโดยกด esc แล้วตามด้วย :wq และ enter ครับ - คอนฟิกไฟล์ f.demo.local
# vi /var/named/f.demo.local
พิมพ์ตามนี้ครับ
$TTL    86400
@       IN      SOA     ns1.demo.local.      root.demo.local. (
                2014082002      ;Serial
                3600            ;Refresh
                1800            ;Retry
                604800          ;Expire
                86400           ;Minimum TTL
)
@                       IN NS   ns1.demo.local.
ns1                     IN A    10.224.202.11
@                       IN A    10.224.202.11
ns2                     IN A    10.224.202.12
เซฟ และปิดครับ - แก้ไฟล์ r.demo.local เลยครับ
# vi /var/named/r.demo.local
ตามด้านล่างนี้เลยครับ
$TTL    86400
@       IN      SOA     ns1.demo.local.        root.demo.local. (
                2014082002      ;Serial
                3600            ;Refresh
                1800            ;Retry
                604800          ;Expire
                86400           ;Minimum TTL
)
@       IN NS   ns1.demo.local.
ns1     IN A    10.224.202.11
11      IN PTR  ns1.demo.local
ns2     IN A    10.224.202.12
12      IN PTR  ns2.demo.local
เซฟและปิดครับ - จากนั้นคอนฟิกที่ตัว secondary ครับ
# vi /etc/named.conf
options {
listen-on port 53 { 127.0.0.1; 10.224.202.11;}; #ip master server
listen-on-v6 port 53 { ::1; };
directory       "/var/named";
dump-file       "/var/named/data/cache_dump.db";
statistics-file "/var/named/data/named_stats.txt";
memstatistics-file "/var/named/data/named_mem_stats.txt";
allow-query     { localhost; 10.224.202.0/24;}; #IP Range client
        recursion yes;
        dnssec-enable yes;
        dnssec-validation yes;
        dnssec-lookaside auto;

        /* Path to ISC DLV key */
        bindkeys-file "/etc/named.iscdlv.key";

        managed-keys-directory "/var/named/dynamic";
};
จากนั้นประกาศ zone ส่วนของ forward zone ก่อนเลยครับ จะคล้ายกันครับต่างกันเล็กน้อย
zone "demo,local" IN {
        type slave;
        file "slaves/f.demo.local";
        allow-transfer { 10.224.202.12/24; }; #IP slave server
        masters { 10.224.202.11; };   #master ipaddr
};
จากนั้นก็ reverse zone ครับ
zone "202.224.10.in-addr.arpa" IN {
        type slave;
        file "slaves/r.demo.local";
        allow-transfer { 10.224.202.12/24; };
        masters { 10.224.202.11; };
};
เซฟและออกครับ
ส่วนไฟล์ f.demo.local และ r.demo.local ไม่ต้องคอนฟิกครับ เดี๋ยวมันจะทำการ sync กันเองครับ - จากนั้นก็ไปแก้ไขไฟล์ /etc/resolv ของทั้งสองตัวเลยครับ
# vi /etc/resolv.conf
ให้ลบบรรทัดอื่นให้หมด และใส่แค่
nameserver 127.0.0.1
- จากนั้นก็ start service โลดเลยครับ
# service named start
หรือ
# /etc/init.d/named start
- จากนั้นก็ทดสอบครับ
# nslookup ns1.demo.local
ต้องได้ประมาณ
Server:         127.0.0.1
Address:        127.0.0.1#53

Name:   ns1.demo.local
Address: 10.224.202.11

# nslookup ns2.demo.local

Server:         127.0.0.1
Address:        127.0.0.1#53

Name:   ns2.demo.local
Address: 10.224.202.12
- หรือจะตรวจสอบจากการเช็ค serial ก็ได้ครับ
# dig demo.local +nssearch | cut -d ' ' -f 4 | sort | uniq -c

ผลลัพธ์ประมาณนี้ครับ
1 2014082002
ถ้าตรงกันทั้งสองฝั่งก็ใช้ได้ครับ
Saturday, August 16, 2014
สิ่งที่ควรทำหลังจาก clone vm linux(CentOS) guest
การที่เราโคลน vm สักตัวมาใช้ จะช่วยลดระยะเวลาในการติดตั้ง OS ได้มากเลยทีเดียวนะครับ แต่เมื่อโคลนเสร็จแล้วเราต้องทำอะไรบ้างล่ะ เรามาดูกันดีกว่าครับ
- แก้ชื่อเครื่อง
# vi /etc/sysconfig/network
แก้ไขตรง
HOSTNAME=[New_Hostname] - แก้ไขไฟล์ hosts
# vi /etc/hosts
ใส่ xx.xx.xx.xx(ip address ใหม่) hostname(ใหม่)
ส่วนอันเก่าก็ลบได้เลยครับถ้าไม่ได้ใช้ - แก้ mac address
# vi /tc/udev/rules.d/70-persistent-net.rules
ลบ mac address ที่ไม่ใช่ตัวปัจจุบัน
** เช็คได้จาก vm->edit setting->network adapter แล้วดูตรง mac address ครับว่าตรงกับอันไหน ก็ลบอันอื่นทิ้งครับ - แก้ IP Address ครับ
# vi /etc/sysconfig/network-scripts/ifcfg-eth(n)
แก้ตรง
IPADDR=
NETMASK=
GATEWAY=
Monday, August 11, 2014
การสร้าง Standard virtual Switch บน vSphere client
หลังจากที่เรารู้จักกับ Standard virtual switch และ distributed virtual switch กันแล้ว คราวนี้เรามาสร้าง standard virtual switch กันเลยดีกว่าครับ
- เปิด vsphere client และ log in ที่ esx host
- คลิกที่ host ที่ต้องการ -> configuration -> networking -> add networking
- เลือก virtual machine หรือ vm kernel ซึ่งความแตกต่างก็อยู่ในบทความที่แล้วนะครับ จากนั้นกด next ครับ
- เลือก vmnic ที่ต้องการครับ เอาที่ up นะครับ แต่ในที่นี้ผมมีที่ up อยู่แค่พอร์ตเดียวและไม่อยากไปยุ่งครับก็ทดลองให้ดูละกันครับ จากนั้นก็กด Next โลดเลยครับ
- ตั้งชื่อและ vlan ครับ จากนั้นก็ Next เลยครับ
- กด finish ได้เลยครับ
- เพียงเท่านี้เราก็ได้ standard virtual switch มาใช้งานแล้วครับ ง่ายๆเลยครับ
สำหรับครั้งนี้ก็จบลงเพียงเท่านี้้ครับ ครั้งหน้าจะมาสอนแบบ vmkernel นะครับ รอติดตามกันได้ครับ
Sunday, August 3, 2014
Standard virtual switch และ Distributed virtual switch
Virtual switch คืออะไร
จากที่คราวก่อนๆหน้านี้ เราได้พาตัวเองเข้าสู่โลกเสมือนกันมาครึ่งค่อนตัวแล้ว ดังนั้นคราวนี้เรามารู้จักอุปกรณ์เครือข่ายที่ทุกคนน่าจะรู้จักกันอยู่แล้วนะครับ นั่นก็คือ switch นั่นเอง แต่มันจะไม่ได้มาในรูปแบบที่เราจับต้องมันได้ แต่จะมาในรูปแบบของสวิทช์เสมือน (virtual switch) - - สวิทช์ธรรมดาก็ยุ่งพอแล้ว นี่ยังมาจำลองอีก แต่ข่าวดีก็คือ เราไม่ต้องใช้ command ในการตั้งค่าในส่วนนี้นะครับ แต่ข่าวร้ายก็คือ เราต้องไปตั้งค่าสวิทช์จริงๆให้ทำงานสัทพันธ์กันด้วย เอาล่ะครับ เรามารู้จักเจ้าสวิทช์เสมือนกันเลยดีกว่าครับ
virtual switch ใน vmware คือการใช้ซอฟท์แวร์จำลองการทำงานของ Layer 2 switch ครับ
virtual switch จะทำหน้าที่เป็นส่วนที่ทำให้ service ของ network ของ vm ทำงานตามที่เราต้องการครับ ซึ่่ง service ต่างๆ ก็จะมีอยู่ 3 แบบครับ
- Virtual Machine ใช้ Connect กันระหว่าง Virtual Machine กับ Physical Network หรือ ใช้คุยกันเองระหว่าง Virtual Machine
- VMKernel ใช้สำหรับติดต่อ Storage เช่น NFS, iSCSI หรือใช้สำหรับ VMware VMotion
- Service Console ใช้สำหรับ Manage ตัว ESX/ESXi หรือเรียกง่าย ๆ ว่า เป็น IP Address ของ Host ซึ่งจะถูกติดตั้งมาเป็น default เมื่อติดตั้ง ซึ่งก็จะชื่อ management network ที่เราเห็นๆกันนั่นเองครับ
- virtual Standard switch เป็น virtual switch ที่สามารถคอนฟิกได้ใน esxi mode
- virtual Distributed switch เป็น virtual switch ที่ต้องคอนฟิกผ่าน vCenter เท่านั้น
- vStandard switch มีความสามารถในการทำงานเหมือนสวิทช์เลเยอร์2 ทั่วไป ดังภาพด้านล่าง
ซึ่งจะอธิบาย concept คร่าวๆตามภาพได้ดังนี้ครับ
vStandard switch
ขอขอบคุณภาพจาก www.vmware.com
- เราสามารถมี vNIC (Virtual Network Interface) ได้หลายตัวต่อ "ESXi host" ครับ
- Operating system และ Application จะคุยกันผ่าน vNIC โดยใช้ device driver ซึ่ง vNIC จะ map กับ Physical NIC ไปยัง Network ข้างนอกได้
- แต่ละ vNIC มี MAC Address ที่ generate ขึ้นมาและทำงานใน Network Layer 2
- อีกหนึ่งข้างของ Virtual Switch จะเป็น Port Group ใช้ติดต่อ Virtual Machine โดยใช้ Uplink สู่ภายนอก
virtual standard switch จะทำงานในแต่ละ host ดังนั้นเราจึงต้องคอนฟิกตามแต่ละ host และต้องทำทุกตัว - vDistributed switch จะเหมือนทำงานคล้ายกับ vSS เพียงแต่ทำงานได้ในระดับ datacenter จึงมี feature อำนวยความสะดวกเพิ่มมากขึ้น
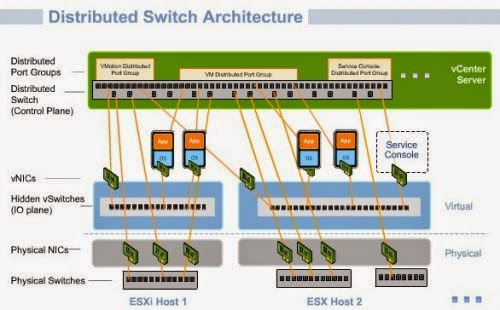
- สามารถมี vNIC ตั้งแต่หนึ่งตัวหรือมากกว่า ต่อ 1 "Datacenter" ก็คือ Manage virtual switch ที่ vCenter Server ที่เดียว แล้ว apply ไปยัง Hosts ต่าง ๆ ซึ่งทุกๆ host จะเห็นเหมือนกัน
vDistributed switch
ขอขอบคุณภาพจาก www.vmware.com
- ใช้ IO Plane (hidden vSwitch) เป็นตัวควบคุม IO ของ Hardware และทำการ Forward Package
- สามารถ Migrate Standard Switch ที่มีอยู่เป็น Distributed Switch ได้
- ลดระยะเวลาในการติดต่อได้ถึง 20 - 25 %
- สามารถทำ Traffic shaping ได้ทั้ง Inbound และ Outbound (vSS ทำได้แค่ Outbound)
- รองรับ Third Party ต่าง ๆ ได้ตารางคุณสมบัติของ vDS และ VSS
ขอขอบคุณภาพจาก www.vmware.com - ตารางเปรียบเทียบระหว่าง vDS และ vSS ครับ


เครดิต : www.vmware.com : www.compspot.net/index.php?option=com_content&task=view&id=366&Itemid=72
Saturday, August 2, 2014
การสร้าง VM template และการ deploy template ด้วย VMware vsphere web client
VM Template คืออะไร vm template ก็คือ แม่แบบเสมือน ที่จะทำเครื่องจักรกลเสมือนมาไว้เป็นแม่แบบได้ ซึ่งมีประโยชน์มากสำหรับการทำโปรเจคเล็กใหญ่ที่จำเป็นต้องสร้างเครื่องจักรกลเสมือนหลายๆตัว ซึ่งแต่ละตัวใช้ระบบปฏิบัติการเดียวกัน ครั้นจะมานั่งติดตั้งทีละตัวก็ใช่ที่ จะโคลนใหม่ก็ช้า วันนี้เรามาเรียนรู้วิธีอีกวิธีหนึ่งกันเลยดีกว่าครับ
การสร้างแม่แบบเสมือนด้วยการ clone to template
การ deploy VM template นะครับเริ่มที่
การสร้างแม่แบบเสมือนด้วยการ clone to template
- ที่หน้า vSphere web client ดูที่หัวข้อ inventory แล้วเลือก vm and template ครับ
- คลิกขวาที่ vm ที่เราต้องการนำมาทำเป็น template แล้วเลือก Clone to template.. ครับ
- จากนั้นจะมี pop up ขึ้นมาครับ
ให้เราทำการตั้งชื่อ template และเลือก datacenter ครับ - เลือก host(ESXi) ครับ
- เลือก Datastore และ Disk Provision ครับ
- ตรวจสอบความถูกต้อง และกด finish ได้เลยครับ
การ deploy VM template นะครับเริ่มที่
- ในหน้า VM and Template คลิกขวาที่ template ที่ต้องการ แล้วเลือก deploy vm from this template... ครับ
- ตั้งชื่อให้กับ VM และเลือก datacenter ครับ
- เลือก host ที่ต้องการให้ทำหน้าที่ run vm ครับ
- เลือก datastore ที่ต้องการใช้เก็บไฟล์ของ vm ครับ
- จากนั้นถ้าต้องการแก้ไข VM hardware ให้ติ๊กถูกที่ customize this virtual machine hardware แล้วกด next ครับ ถ้าไม่ต้องการแก้ไขก็ไม่ต้องติ๊กถูกและกด next และข้ามไปข้อ 7 ได้เลยครับ
- ทำการปรับแต่ง vm ตามต้องการ
- ตรวจสอบความถูกต้อง และกด finish ได้เลยครับ
- สังเกตทางขวามือนะครับ จะมี job run อยู่
Saturday, July 26, 2014
การ Export และการ deploy VM แบบ OVF,OVA
ไฟล์ .OVF คืออะไร?
ไฟล์ .OVF คือ ไฟล์นามสกุล open virtualization format
ไฟล์ .OVF คือ มาตรฐาน แบบ Distributed Management Task Force (DMTF) ที่ช่วยให้ Virtual Machine หรือ Virtual Appliance สามารถ Import และ Export ได้ด้วยระยะเวลาอันสั้น พูดง่ายๆ มันคือการที่ใช้ในการ Copy OS อีกวิธีหนึ่งนั่นเอง และตอน import ยังสามารถปรับแต่งค่าได้โดยสามารถใช้งานได้เลยอีกด้วย
ส่วนไฟล์ .OVA คือ open Vvirtualization appliance ครับ ไฟล์นี้จะรวมเอาไฟล์ที่ตอนเรา Export เป็น ovf อยู่ในไฟล์เดียว ก็คือรวมเอาไฟล์ .ovf , ไฟล์ .mf(check sha1 sum), ไฟล์ .vmdk ไว้ครับ
ทีนี้มาเริ่มขั้นตอนในการ Export VM ออกมาเป็น OVF กันเลยดีกว่าครับ
ขั้นตอนการ Export ก็มีเพียงเท่านี้ครับ
ต่อปไปเรามาดูขั้นตอนการ Deploy กันต่อนะครับ
- เลือก file -> Deploy OVF Templete จากนั้นในหน้าต่างที่เด้งขึ้นมา ให้เลือก browe ครับ
- เลือกไฟล์ที่ต้องการครับ **เป็น .ovf หรือ .ova ก็ได้ครับ
- คลิก next ครับ
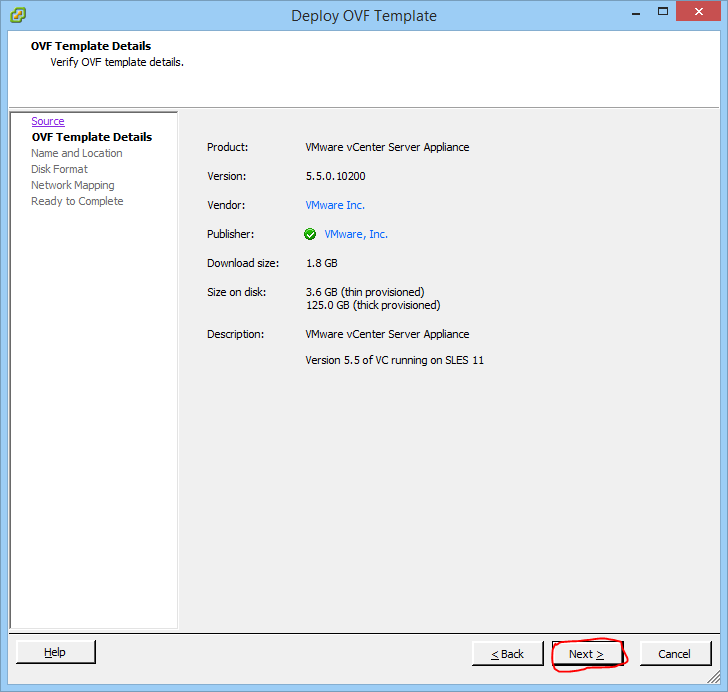
- หน้านี้จะแสดงข้อมูลของ templete ครับ คลิก next
- ตั้งชื่อให้ VM ครับแล้วคลิก next
- เลือก Disk provision ตามที่ต้องการแล้วคลิก next ครับ
- จับคู่ virtual network interface card กับ virtual switch ครับ
- ตรวจสอบการตั้งค่าถ้าตรงตามต้องการก็คลิก finish โลดเลยครับ
- จากนั้นก็จิบกาแฟ ฟังเพลงรอครับ
Wednesday, July 23, 2014
add new virtual disk to vmware linux guest no reboot
When you add new disk to linux guest virtual machine. You cannot see new disk. But You must be re-scan new scsi device or rebooting OS.
In this tutorial. I will re-scan disk without rebooting OS. Please follow this step
In this tutorial. I will re-scan disk without rebooting OS. Please follow this step
- click edit VM you want add new disk.
- In this window.Click add.
- Select Hardisk and click next.
- choose Create new virtual disk.
- Assign disk size, Choose disk provisioning
- Thick provision lazy zeroed is Creates a virtual disk in a default thick format. Space required for the virtual disk is allocated when the virtual disk is created. Data remaining on the physical device is not erased during creation, but is zeroed out on demand at a later time on first write from the virtual machine.
Using the default flat virtual disk format does not zero out or eliminate the possibility of recovering deleted files or restoring old data that might be present on this allocated space. You cannot convert a flat disk to a thin disk.
- Thick provision eager zeroed is A type of thick virtual disk that supports clustering features such as Fault Tolerance. Space required for the virtual disk is allocated at creation time. In contrast to the flat format, the data remaining on the physical device is zeroed out when the virtual disk is created. It might take much longer to create disks in this format than to create other types of disks.
- Thin provinsion is Use this format to save storage space. For the thin disk, you provision as much datastore space as the disk would require based on the value that you enter for the disk size. However, the thin disk starts small and at first, uses only as much datastore space as the disk needs for its initial operations. - Click next.
- Verify disk option and click finsh.
- open console of VM guest.
- runcommand
# ls /sys/class/scsi_host/
- output
host{x} - rum command for re-scan disk.
# echo "- - -" > /sys/class/scsi_host/host{x}/scan - run command for format disk.
# fdisk -l /dev/sdb
# mkfs.ext3 /dev/sdb
- make directory for mount point.
# mkdir /data
- mount disk.
# mount /dev/sdb /data
- follow next step to auto mount.
# vi /etc/fstab
- type this text to last line file.
/dev/sdb /disk3 ext3 defaults 1 2
Monday, July 21, 2014
How to install phpMyAdmin on debian7 or ubuntu
phpMyAdmin is a free web software to work with MySQL on the web. It provides a convenient visual front end to the MySQL capabilities.
Before working with phpMyAdmin, you need to have LAMP installed on your server. If you don't have the Linux, Apache, MySQL, PHP stack on your server, you can find the tutorial for setting it up here.
Install phpMyAdmin
In Debian and Ubuntu it simple.You can use apt-get for setup it.
if you enabled sudo
During the installation, phpMyAdmin will walk you through a basic configuration. Once the process starts up, follow these steps:
Select Apache2 for the server
Choose YES when asked about whether to Configure the database for phpmyadmin with dbconfig-common
Enter your MySQL password when prompted
Enter the password that you want to use to log into phpmyadmin
After the installation has completed, add phpmyadmin to the apache configuration.
You can then access phpmyadmin by going to youripaddress/phpmyadmin.
Before working with phpMyAdmin, you need to have LAMP installed on your server. If you don't have the Linux, Apache, MySQL, PHP stack on your server, you can find the tutorial for setting it up here.
Install phpMyAdmin
In Debian and Ubuntu it simple.You can use apt-get for setup it.
# su -
# apt-get install phpmyadmin
or
# sudo apt-get install phpmyadmin
if you enabled sudo
During the installation, phpMyAdmin will walk you through a basic configuration. Once the process starts up, follow these steps:
Select Apache2 for the server
Choose YES when asked about whether to Configure the database for phpmyadmin with dbconfig-common
Enter your MySQL password when prompted
Enter the password that you want to use to log into phpmyadmin
After the installation has completed, add phpmyadmin to the apache configuration.
# sudo Include /etc/phpmyadmin/apache.conf > /etc/apache2/apache2.conf
Restart apache2 Service.
# sudo /etc/init.d/apache2 restart
Labels:
apache,
Database,
Database Admin,
debian,
lamp,
Linux,
myslq,
phpMyAdmin
Sunday, July 20, 2014
How to install GlusterFS on Debian 7 wheezy
This tutorial I will explain GlusterFS configuration in Debian 7.6.0 and You can use this tutorial for ubuntu. GlusterFS is an open source distributed file system which provides easy replication over multiple storage nodes. Gluster File System is a distributed filesystem allowing you to create a single volume of storage which spans multiple disks, multiple machines and even multiple data centres.
How to use it? It simply.Please follow this step below.
Prerequisites
How to use it? It simply.Please follow this step below.
Prerequisites
- 2 x Debian 7 Server
- IPaddr and hostname for all server
- Server 1 ipaddr : 192.168.207.129
Server 1 hostname : debian7n1 - Server 2 ipaddr : 192.168.207.130
Server 2 hostname : debian7n2
The next step is to make the all machines server.
$ su -
# wget -O - http://download.gluster.org/pub/gluster/glusterfs/3.5/3.5.1/Debian/pubkey.gpg | apt-key add -
# echo deb http://download.gluster.org/pub/gluster/glusterfs/3.5/3.5.1/Debian/apt wheezy main > /etc/apt/sources.list.d/gluster.list
# apt-get install glusterfs-server glusterfs-client -y
# update-rc.d glusterd defaults
# gluster --version

glusterfs 3.5.1 built on Jun 28 2014 04:14:49

Repository revision: git://git.gluster.com/glusterfs.git

Copyright (c) 2006-2011 Gluster Inc. <http://www.gluster.com>

GlusterFS comes with ABSOLUTELY NO WARRANTY.

You may redistribute copies of GlusterFS under the terms of the GNU General Public License.
Now it is mandatory that both machines must listen to each other with their hostname
# vi /etc/hossts
192.168.207.129         debian7n1
192.168.207.130         debian7n2
Now step : run this command gluster peer probe [hostname] in debian7n1 for connect both machine
# gluster peer probe devian7n2
peer probe: success

# gluster peer status

Number of Peers: 1

Hostname: debian7n2
Uuid: 58e8bbb2-6067-47b3-b1c7-1f2316d55013
State: Peer in Cluster (Connected)
# fdisk -l /dev/sd*
Disk /dev/sdb: 5368 MB, 5368709120 bytes 255 heads, 63 sectors/track, 652 cylinders, total 10485760 sectors Units = sectors of 1 * 512 = 512 bytes Sector size (logical/physical): 512 bytes / 512 bytes I/O size (minimum/optimal): 512 bytes / 512 bytes Disk identifier: 0x00000000 Disk /dev/sdb doesn't contain a valid partition table
# mkfs.ext3 /dev/sdb
mke2fs 1.42.5 (29-Jul-2012)
/dev/sdb is entire device, not just one partition!
Proceed anyway? (y,n)  y
Filesystem label=
OS type: Linux
Block size=4096 (log=2)
Fragment size=4096 (log=2)
Stride=0 blocks, Stripe width=0 blocks
327680 inodes, 1310720 blocks
65536 blocks (5.00%) reserved for the super user
First data block=0
Maximum filesystem blocks=1342177280
40 block groups
32768 blocks per group, 32768 fragments per group
8192 inodes per group
Superblock backups stored on blocks:
32768, 98304, 163840, 229376, 294912, 819200, 884736
Allocating group tables: done
Writing inode tables: done
Creating journal (32768 blocks): done
Writing superblocks and filesystem accounting information: done
# mkdir /data
#mount /dev/sdb /data
Now we need to create the volume where the data will reside. The volume will be called GlusterVol. Now run on any machine.
please follow this step on one machine:
run this command to start volume
# gluster volume create GlusterVol replica 2 transport tcp debian7n1:/data debian7n2:/data force
volume create: GlusterVol: success: please start the volume to access data
run this command to start volume
# gluster volume start GlusterVol volume start: GlusterVol: success # gluster volume info
Volume Name: GlusterVol
Type: Replicate
Volume ID: 63bc4f7e-beb1-47b5-9cb9-9f111cb6b510
Status: Started
Number of Bricks: 1 x 2 = 2
Transport-type: tcp
Bricks:
Brick1: debian7n1:/data
Brick2: debian7n2:/data
Congraturations!!!ํ
You installed gluster server is complete now.
Thank you : http://download.gluster.org/pub/gluster/glusterfs/3.5/3.5.1/Debian/README
and
http://www.howtoforge.com/how-to-install-glusterfs-with-a-replicated-volume-over-2-nodes-on-ubuntu-14.04
Thank you : http://download.gluster.org/pub/gluster/glusterfs/3.5/3.5.1/Debian/README
and
http://www.howtoforge.com/how-to-install-glusterfs-with-a-replicated-volume-over-2-nodes-on-ubuntu-14.04
Saturday, July 19, 2014
How to install LAMP on Debian 7
หลังจากที่เราติดตั้ง Debian 7 กันไปแล้ว คราวนี้เรามาทำ web server หรือที่เค้าเรียกกันว่า LAMP(Linux, Apache, My Sql, PHP) กันดีกว่าครับ
**หมายเหตุ
ถ้าจะเข้าใช้จากชื่อเครื่องต้องไปใส่ที่ไฟล์ /etc/hosts ก่อนนะครับโดยเพิ่ม
เข้าไปครับ
ว่าแล้วเราก็มาเริ่มกันเลยดีกว่าครับ
- ก่อนอื่นเราต้องเข้าเป็น root ของระบบก่อนนะครับ
$ su -
- จากนั้นเรามาทำการอัพเดตกันหน่อยครับ
root@debian:~# apt-get update
- จากนั้นก็ติดตั้ง my sql ครับ
root@debian:~# apt-get install mysql-server mysql-client
- ตั้งรหัสผ่าน root ของ mysql ครับ
- ยืนยันรหัสผ่านครับ
- ติดตั้ง apache ครับ
root@debian:~# apt-get install apache2 -y
- ต่อไปก็ติดตั้ง Php, perl และ pyton ครับ
root@debian:~# apt-get install php5 php-pear php5-mysql libapache2-mod-php5 -y
root@debian:~# apt-get install perl libapache2-mod-perl2 -y
root@debian:~# apt-get install python libapache2-mod-python -y
- รีสตาร์ท service อีกทีครับ
root@debian:~# /etc/init.d/apache2 restart
- ทดสอบการใช้งาน php
root@debian:~# nano -w /var/www/test.php
- ใส่ Code นี้ลงไปครับเป็น code แสดงข้อมูลต่างๆของ php ที่ติดตั้งไปครับ
<?php
     phpinfo();
?>
- ทดสอบโดยการเปิด browser แล้วไปที่ http://<IP-address or Server name>/test.php ถ้าขึ้นก็เป็นอันใช้ได้ครับ
**หมายเหตุ
ถ้าจะเข้าใช้จากชื่อเครื่องต้องไปใส่ที่ไฟล์ /etc/hosts ก่อนนะครับโดยเพิ่ม
ip-address hostname
เข้าไปครับ
เสร็จเรียบร้อยแล้วครับสำหรับการติดตั้ง ถ้าจะเอาหน้าเพจไปใส่ก็ใส่ที่ /var/www/ ได้เลยครับ
credit by : https://www.digitalocean.com/community/tutorials/how-to-install-linux-apache-mysql-php-lamp-stack-on-debian
credit by : https://www.digitalocean.com/community/tutorials/how-to-install-linux-apache-mysql-php-lamp-stack-on-debian
Thursday, July 17, 2014
How to install Debian 7.5 on VMware ESXi 5.5
Debian Linux(เดเบียน ลินุกซ์)
Debian คือ Linux Distro เจ้าหนึ่งที่มีผู้ใช้งานมากมายทั่วโลก ไม่แพ้ตัวอื่นๆเลย แต่ยังไม่มากนักในไทย = = และที่สำคัญเจ้าตัวนี้ยังเป็นต้นแบบของตัวอื่นๆ เช่น Ubuntu ครับ
How to install Debian 7.5 on VMware ESXi 5.5
ในครั้งนี้ผมขอข้ามขั้นตอนการสร้าง virtual machine ปไเลยนะครับ เนื่องจากเคยลงไว้แล้ว ก็แค่เลือก OS ให้ตรงกับที่เราต้องการในครั้งนี้ นั่นก็คือ Debian 7 ครับ ถ้าเสร็จแล้วก็มาเริ่มกันเลยครับ
download link www.debian.org
- เปิดเครื่องก่อนครับ เมื่อเปิดขึ้นมาแล้วจะได้หน้าตาแบบนี้ครับ ถ้าใครไม่ได้แบบนี้ให้รีสตาร์ท VM 1 ทีครับ แล้วเลือก install หรือ Graphic install ครับ แต่ในที่นี้ผมจะเลือก install ครับ
- จากนนั้นเลือกภาษาครับ เป็น English หรือใครถนัดภาษาอื่นก็แล้วแต่ครับ ฮี่ๆๆ (ไม่มีภาษาไทยนะครับ)
- เลือก location ครับ
- เลือกภาษาคีย์บอร์ดครับ
- ใส่ชื่อเครื่องครับ
- ใส่ชื่อโดเมนครับ
- ตั้งรหัสผ่านของ user root ครับ
- อีกครั้งครับ
- สร้างบัญชีผู้ใช้งาน(user account) ครับ
- ตั้ง user name ของบัญชีผู้ใช้ที่เราสร้างเมื่อสักครู่ครับ
- ตั้งรหัสผ่านครับ
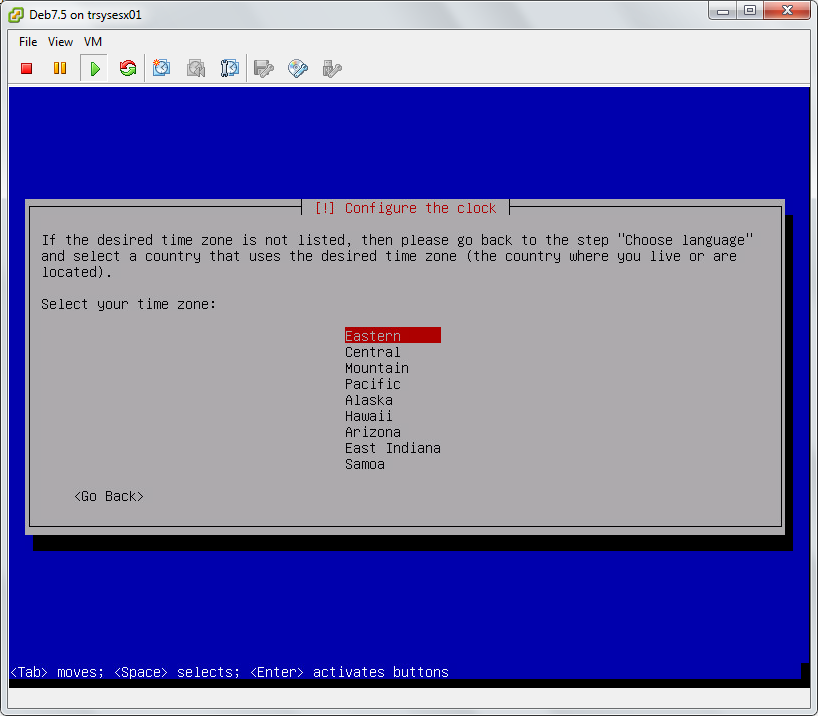
- เลือก Time zone ครับ
- กำหนด partition ครับ เลือกบรรทัดแรกไปได้เลยครับ
- Enter เลยครับ
- เลือกว่าจะแยก /home /usr /var ... หรือไม่ ถ้ายังไม่รู้คืออะไรให้เลือกบรรทัดแรกไปก่อนครับ
- ตรวจสอบ และเลือก finish ได้เลยครับ
- เลือก yes เพื่อยืนยันการเปลี่ยนแปลงครับ
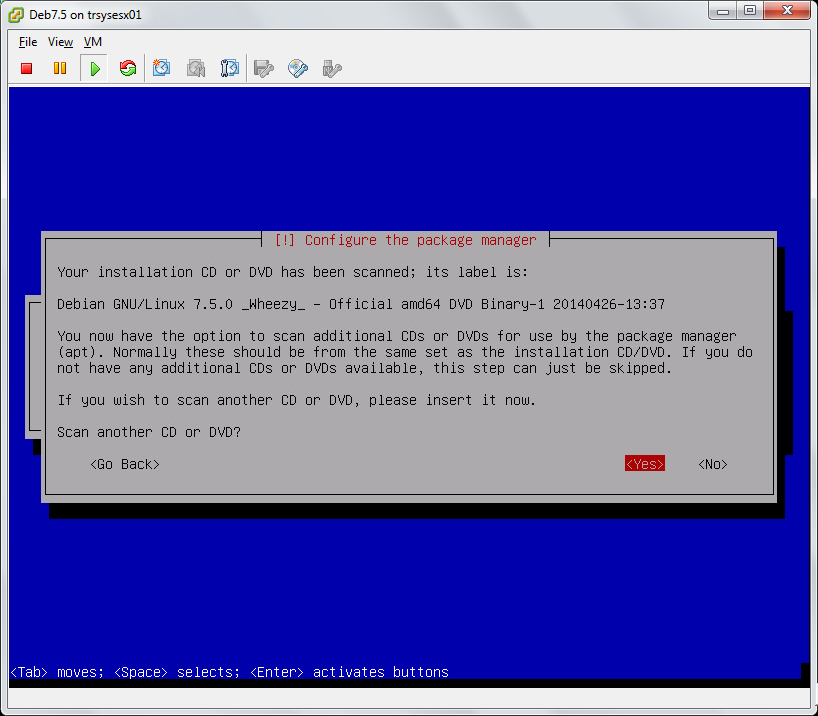
- จากนั้นก็จะถามว่าต้องการติดตั้ง package เลยหรือไม่ ถ้าต้องการก็ตอบ ใช่ ได้เลยครับ หรือจะรอติดตั้งเองหลังจากติดตั้ง OS เสร็จแล้วก็ได้ครับ
- เลือก package ที่ต้องการติดตั้งครับ
- เสร็จแล้วก็รอครับ
- จากนั้นจะถามว่าต้องการติดตั้ง grub boot loader หรือไม่ ตอบ ใช่ ไปเลยครับ
- กด Continue เพื่อสิ้นสุดการติดตั้งครับ หลังจากนั้นเครื่องจะรีสตาร์ทครับ
- หน้าตาหลังจากรีสตาร์ทเสร็จ ก็ล็อกอินเข้า user ที่เราได้สร้างเอาไว้เพื่อเข้าใช้งานได้เลยครับ
- เท่านี้ก็เป็นอันเสร็จเรียบร้อยแล้วครับสำหรับการติดตั้ง Debian 7.5 ครับ
ก็ขอให้สนุกกับการใช้งานกันนะครับ ^ ^
Subscribe to:
Comments (Atom)


